Showing posts with label Ed Tech. Show all posts

Thursday, June 8, 2017

QR Code Inventory


As my students did their Genius Hour projects this year, I've been working on my own. It's something I've wanted to do for a while and was inspired by a post on doing a QR Inventory in the Band Director Group on Facebook. I didn't follow what was shared there exactly, but it was a great spring board for how to make this work in the way I imagined using Google Drive and QRs. It's been tedious, but so worth it. I checked out an instrument to a student with nothing but my phone today!

Here are the nuts and bolts:

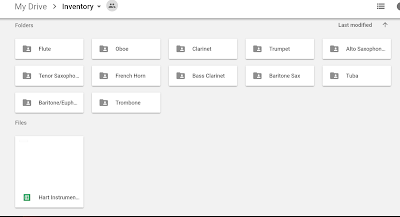
  • First is one master inventory folder.

  • Within those instrument group folders are sub folders for each individual instrument. The QR links back to these individual folders. The green folders are instruments that are checked out to students right now. To change the color, either right click the folder or, if you're on a mobile device, click the three dots on the folder, then select Change Color. Each folder is named with the brand and serial number.


  • Each individual instrument folder has yet more sub folders for pictures (to track instrument condition), repair slips, and a Google Sheet with the instrument check out information such as Student name, case number, date the instrument agreement was handed in, any accessories in the case, etc. Pictures taken can be added to Drive through the app on a mobile device.


  • Once all of the folders and sub folders are created, this magic extension will populate a Google Sheet with the links to each of the sub folders! I use the URL option. Use the link to the Instrument Group folder and it will give you a sheet with the sub folders for that instrument.


  • It makes a folder of folders into this!


  • From there, this QR Generator will create a page of QR codes from the column of links. 


  • The QR codes can then be printed and attached to the instrument cases. Through the sharing settings on the folder, I am the only one who can access the information when the QR is scanned to protect student information. After downloading the Google Sheets app, the spreadsheet can be edited from my phone.


Voila! A QR inventory system!
Now to check the instrument in/out I just scan the QR, update the Sheet, and change the folder color!

Hopefully this made sense, but I'm happy to elaborate and clarify if needed! It's always a little different when describing the process for someone else than it was going through it at the time. Thoughts? Questions? Additions?


Sunday, June 4, 2017

Return of #GeniusHour Part 3

Progress! Students are working hard on their projects. This year seems to be going better than last, and a lot of that has to do with having a better idea of how to get students rolling and laying out clearer expectations. There's a greater variety in what they're working on this year as well (we'd LOVE it if you leave them a few comments!!!) Last year, all students were limited to relating their project to music. Because the 8th Graders have done this process once though, they had the option of anything related to the arts.

I am running into a few more engagement issues this year than last. The first time, I had them in the media center to work on projects less often so work was more focused. However, most students said last year that more time would have really helped. We've been in there pretty much exclusively over the last week and a half though, so there's less of a drive to get things done in the time we're here. Next year will need some revamping of our time and possibly steering more towards calling these Passion Projects instead of Genius Hour.

Next week will be focused on putting together presentations and practicing them!

For my inventory project, I have almost all of our instruments into the new system and with going through this process, I also have a better idea of my repair priority list too. Next week's goal will be finding the remaining straggling instruments still at students' homesprinting and attaching all of the QR codes. I'm really excited with how this is turning out and am looking forward to creating a "how to" post that others might be able to utilize to set up their own QR inventory.


To share my process with students (since I'm doing a project along with them), I'm thinking an infographic might work out. It will have information including a breakdown of how many instruments, how many of each type, links and resources I used, etc.

Two weeks to go!

Friday, May 26, 2017

Return of #GeniusHour Part 2

Student projects are already starting to take shape and I've gotten to start working on my inventory project as well.

Student projects:

  • We've started blogging! Building on last year's experiences, I wrote this post to help provide guidelines for writing blog posts. (Thank you to Aubrey Yeh for sharing and helping me gain some feedback to share with students!!!) From reading through what they've shared so far, it does seem to be helping. Blogs were a big thing I wanted to improve on from last year and they're looking better already. The students would LOVE some feedback on their writing and projects. Please check out their posts and leave a comment. It would be really cool if you mention where you're from in the comment too!
  • There's a pretty interesting array of projects being worked on so far. Since the 8th Graders did this last year with a focus around anything musically related, we opened up to anything in the arts. Some students are excited to be working on things that interest them even more than what they were able to do last year.
  • With two weeks of in class working left, time is going to go faster than they realize. I'm going to get the presentation sign up posted for them next week so that they can start planning accordingly.
My project:
  • I've actually started getting instruments added to the inventory I laid out here. This is going to be a challenge as tedium is not a strong suit for me. However, it needs to be done and will be a huge help in the long run.
  • Our district technology specialists came through big time and found me an extension to add links to the folders I create to a Sheet! From there I'll use another extension to create the QR codes. 
  • I'm really wishing I had a label maker to do the QRs as I go along. Things could start to get confusing when instruments I haven't made it to yet get added to those I have. Right now I'm going to focus on getting everything into the system and doing the QR's at the end. 
  • Borrowing a cart so that I can move instruments down to the media center as the students are working is going to be a must if I want to get this done in time. Time to talk with the custodians to see what I can use for a bit.
  • I am planning on presenting at the end too since I'm following along with the project guidelines the students are following. Since I gave them such a hard time about Thinking Outside the Powerpoint, I really want to come up with a fun way to share on a not particularly fun subject. I'm open for ideas on a cool way to present my learning!

Thursday, May 18, 2017

Return of #GeniusHour

One of my favorite times of year has come. We're starting Genius Hour projects again! Last year was the first time we tried this and it was an outstanding experience. With only one performance remaining, we're finally getting to dig into our projects we'll spend the remainder of the year on.

Since last year I was learning a lot of the process to help students, doing Genius Hour with them was my Genius Hour project. Now that I've got a better handle on things, I've decided to do my own project and go through the process along with them.

My first idea had been to learn some guitar basics. On top of always wanting to play it, it would help refresh some rusty theory skills which can only be a bonus.

Then this post came across my feed and got me thinking differently:
If I'm going to ask my students to step outside their comfort zone and go for a project that can have a bigger impact, why would I not do the same?

My project is going to be to create an inventory system for our school owned band instruments using QR codes, Google Sheets, and Google Drive.

Building on an idea shared in the Band Directors Facebook Group, here's what I'll try:

  1. Master folder in Drive for Inventory.
  2. Subfolders categorized by instrument.
  3. Subfolders within those for each individual instrument, labeled with the brand of the instrument and its serial number.
  4. Each individual instrument folder will have:
    1.  A Sheet with information on who it was checked out to, how/whether they paid the school fee, rental contract return date, etc. 
    2. Pictures of the instrument so I can track its condition
    3. Copies of any repair slips.
  5. The QR that I'll attach to the instrument case will link to the individual instrument folder.
My only concern is that this won't give me one master spreadsheet to track things. I've had suggestions to create a script or code to add a link in a sheet whenever I create a folder, but that's pretty far outside any of my technical abilities.

Has anybody ever done their inventory like this? Or have a different suggestion on how to do this using QRs? I'm open for suggestions before getting this started next week!

Saturday, September 24, 2016

Word Wall 2.0

I'm making some headway on my list of new things to try this year. One of the techy ones was to create an interactive word wall using augmented reality. The idea is that when a word on the wall is scanned with the appropriate app, a video comes up with an explanation and/or demonstration of the term. I saw the idea at MACUL a couple of years ago and I've been dying to try it out. There were a few kinks to be worked out as I was learning some of the technology right along with the students, but most of them have it done now and I'm really happy with how it's looking!

While there are many augmented reality applications and sites out there, we used BlippAR. Within a couple days of requesting an educational account, I had an email invite to set it up. Once you're set up, you'll have to add your students under your umbrella account by choosing manage users, and then invite them to your project. It's important that students create within one project so that only one campaign code is needed to read all their Blipps.

Once my eighth graders set up their account through my invite and created a word card that would go on the wall, I shared these directions in Google Classroom.


Through trial and error and a few emails/chats with our extremely helpful Blippar representative here are some things we figured out:
  • One challenge we encountered was that the image and video have to be pulled from the computer's storage. Most students did their image and video on their phones and sent them to their email to be downloaded to the computer, then uploaded into BlippAR (this whole process was actually more complicated than creating the actual Blipp!). If students had a cord to directly plug into the computer, it was much easier than trying to email large files.
  • Another issue was that .MOV wasn't always cooperative to get into the program and edit correctly as .mp4. Once we figured that out, a lot of students used free file converters online and it fixed many issues.
  • Students do not need to publish and make their Blipp live. As long as it works with the campaign code entered in the settings, others with the same code will be able to see their creation. If they publish it live, it will not work because one of the ways BlippAR keeps things secure for students is to keep things visible only to those that the codes are shared with.
  • After adding the video to the Blipp, students should wait a minute or two before clicking Test/Publish to see if it works. If they do it too soon, sometimes the video hasn't finished processing.
  • It doesn't just look cooler if the word is decorated and uses some color, it makes it easier for the app to distinguish between that and the other things it picks up in the background.


Our still under construction, but good looking "wall!"


The larger paper in the upper left includes instructions on what app to use and the campaign code that has to be entered so that the videos associated with the cards will work. You can see it closer here.

While I did miss the ease of instantly creating on a mobile device like I've done before with younger students in Aurasma, BlippAR's design studio provides the possibility of some really interesting student creation, as well as providing me a platform to assist students with their projects directly. Having our own representative for additional support was great too! Email feedback was responded to quickly, and I even did a Google Hangout with our rep because BlippAR is looking to learn and continue to improve their educational offerings. 

Now that I've finally gotten to try it, I'm looking forward to finding other ways to incorporate this into our classroom. Once we got past some of the initial frustrations, the students seemed to really enjoy it and I love the reactions of students and colleagues who have never used augmented reality! 

Do you use AR in your classes? Have some ideas on other ways to get students creating with it? Please share!

Tuesday, August 2, 2016

New Year, New Ideas

Just like people post about goals on their social media so that others check in and hold them accountable, I'm going to try the same idea with plans to start the school year and continue throughout. I've forced myself to actually take time off this summer and wait until August to start officially planning, but that means I've got a lot of ideas bouncing around that I haven't actually put down on "paper."

I'm hoping that posting these will help me keep on track:

  • Continue to move more towards standards based grading, even though I'm on an A-E system. I want to establish clearer rubrics so that students better understand the system and can use it to improve as well as find better ways for students to feel that they earned a "successful" grade at the end of the marking period. Last year students were allowed unlimited retakes, extremely flexible deadlines, and I stopped including behavior as a part of their grade. However, many did not take advantage of these opportunities and so ended up with grades that they were not expecting from "just band." I've gotten some great resources from a friend on how he used it with his bands and need to really sit down and work it out for mine. 
  • Giving my student more input and control over our social media. Each class hour will have a section of the week that will be in charge of coming up with one post and one summary of that week's activities to be included on the update for our website. They can take pictures and email me the caption to go with their post that I'll then share on our accounts. Student posts will also have their own hashtag in addition to our school and fine arts tags. 
  • Interactive word wall. I saw the idea to create an interactive word wall using Aurasma at MACUL a couple of years ago, but until this year didn't have the circumstances to try it. The eighth graders will be assigned musical terms and have to design a card with their word on it. When the word is scanned with the app, a short video of that student will come up with an explanation and demonstration. When new terms come up in our  music, students will now be able to learn from each other, even if they're not in the same class.
  • Updating room decorations. Seventh graders will work in groups to come up with relevant quote posters for the room. We're fortunate to have an actual poster printer, so they'll create them online with sites like Canva.
  • Flexible seating options. Obviously this cannot be done full scale in a band room. Putting a 6th grade tuba player on a yoga ball is just screaming for unpleasant headlines, lawsuits, and job searching. What I imagine are some spaces at the front of the room and around the outside with some comfy chairs, stools, cushions, etc that can be easily moved and stacked. Many students come in almost half an hour before school starts and hang out with friends and we also do a lot of collaborative work that doesn't always involve their instruments. I'd like to have some options other than band chairs and stands for kids. My first step will be to reach out to our families and see what they might have sitting in the basement that they'd be willing to donate. Next I'll try some resale shops and my last stop will be Amazon. As it comes in, I'll have students help figure out how to arrange things and get it all set up.
What are some of your new ideas this year? Please share and we can help keep each other motivated!


Saturday, July 16, 2016

Band Portfolios with Google Sites

Portfolios have come and gone and come again over the years as a way to track student growth. For our non-music colleagues, these were a little easier to maintain. Tracking and storing evidence like paper or pictures of projects was definitely much less complicated than tapes (both audio or VHS), mini disks, or CDs.  Technology though has now opened up a huge number of options for tracking music student progress over time by creating digital portfolios.

I claim zero credit for any of these ideas. In fact, it was a colleague who introduced me to the idea last fall. I know that many people are looking at ways to incorporate this though, so I wanted to share one way it could be done.

This video shows how our middle school students set portfolios up using a Google Site.  Since we use Google Classroom for all of our assignments, it's very easy to get videos from students' Drive to their Site.


A few quick tips I did not mention in video:

  • Make sure your students are renaming their videos as they go along. They are often uploaded with generic number/letter names that make them difficult to sort through later.
  • Check your district's policies on student created sites. Ours can create them, but their default setting is private and they can only be shared with people in our domain. This is beneficial for student protection and privacy, but unless they open their sharing with me I cannot see their site.
  • I used Screencastify to make this video. When this was first assigned, I did a similar one that was a little more specific for students, then loaded it as an assignment in Google Classroom along with a list of the specific assignments and tests I wanted added to their portfolio. It's free and fairly easy to use and may be a good way to help your students with their initial set up.
  • Each semester I posted a list of assignments that students needed to add to their portfolio in Google Classroom. The list usually included a couple of playing tests (every beginner added Hot Cross Buns to their portfolio), some of their written work, a practice reflection, and then I let them choose something else to add.

While a Google Site makes the most sense for our students with our current technology set up, this can easily be done with a variety of other hosting platforms such as Weebly. It could even be done through something like KidBlog because students can also add from their Drive to a blog post. The great thing is that no matter what platform you use, there are lots of options to help your students track their progress over time!

How are you doing digital portfolios? Please share your ideas in the comments!

Thursday, July 7, 2016

An Alternative to the Practice Minute Log

Ah, the practice minute log. Few topics will bring up as heated a discussion among instrumental teachers as grading students for minutes practiced outside of school.

On one side you'll get the arguments about how they've been used for years, recommended numbers of minutes per age/grade, and a general belief that even if some kids are lying about their numbers, it's still encouraging more kids to practice than if there were no logs assigned at all.

On the other side you'll find people frustrated with the dishonesty students (and sometimes parents) display in regards to numbers of minutes, people equating them to reading logs which are also under fire, and the frustrations of a one size fits all approach to assigning practice.

Both sides mean well and want to find ways to help students establish solid practice routines.

I'd like to offer an alternative to the minute log.

Practice reflection videos.

Without the technology available today, these would not have been feasible before. However, with the multitude of available online learning management systems, including my choice, Google Classroom, it's a highly doable option.

I'll be the first to admit that practice reflections were a work in progress over the course of the year, but the information gained from them was worth their use and continual revising.

How:
  • To start off, students were allowed to choose any goal they wanted. For the beginners, many used their first one to do things like show how to put their instrument together or make a sound on the mouthpiece.
  • In each reflection they had to demonstrate their improvement from the week before and set a new goal.
  • It was a requirement to play in each reflection (a few kids got into a habit of showing how to disassemble/reassemble their valves for weeks on end...).
  • Occasionally, a specific section of music was assigned in preparation for a concert. They had to demonstrate their skill at it one week, then show their improvement the next.
  • Reflections were credit/no credit. They could be turned in late, but no more than two weeks past their original due date OR had to be in prior to the concert they may have been directly related to. Students who did not earn credit (likely due to not demonstrating by playing something) had the opportunity to redo it as long as they stayed within the final deadlines.
Why:
  • If they have to take home their instrument, get it out, and play something related to what you're working on, you've won half the battle! They're playing their instrument at home!
  • Practice reflections gave insights into student learning, thinking, and overall trends. Individual feedback could be given through Google Classroom, but if there was an overall theme to a week's reflections, it was addressed in class.
  • Treating them as musicians and not just students puts them in charge of their own learning. Rather than just meeting a minute quota, they were told they needed to practice as much as was necessary to meet their goal. Some weeks this meant more or less time, which is how a musician would determine their practice time.
  • Students could set their own pace. While some students were still figuring out the difference between a whole and half note, other kids had been taking music lessons for years before starting band and were trying to figure out much more difficult music.
  • Classes this past year were anywhere from 30-55 students. Watching these videos offered a chance to check in on individuals which is difficult in a large class. Additionally, when taken out of the class setting, it was a nice opportunity to get to know the student a little better. Many kids really enjoyed talking to the camera and often introduced siblings, family members, and even pets who may have popped through their video.
A few challenges:
  • These take a lot more time to go through than checking off minute logs if you view them all. As the year went on and students figured out their process, practice reflections became more efficient and were assigned less often though. Since their videos were all in Google Classroom, they could be checked from the comfort of my couch, but they can be time consuming. At this point, I just spot check them, but rarely watch every student's video every time. 
  • This was a big cultural shift. For students who had older siblings go through the program and do minute logs, this was a change in the expected routine. Even those who had no specific expectations for class requirements were stumped for a bit. The freedom of choosing and working on their own goals was a new concept for many.
  • While we're fortunate to be in a district where most students have a phone or tablet to use, not all students have access to a device to do their recordings. Those students would upload them to Google Classroom at home, so some students did them in school with one of our devices.
Feedback? Ideas? Ways to make this system better? Other alternatives to minute logs? Please share in the comments!


Wednesday, March 23, 2016

Non-Music Tech Ideas for Music Class

It's a common conundrum for music ed teachers to want (or have) to incorporate more technology usage into their classes. It can be especially challenging when you want to use it to enhance your instruction and not just be tech for tech's sake.  

While there are some obvious option with things like Smartmusic or online composing tools like Noteflight or Flat, there are a lot of options that can be utilized that are not music-specific.  Here are a some of my favorites and ideas on ways to incorporate them:
  • Padlet
    • Padlet is a great collaborative site that I compare to a big digital white board. Those with the link can click anywhere on the wall and share a thought, link, picture, or video. It gives a lot of options for privacy settings as well as moderating posts to make sure things stay appropriate. In the past, I've set one up with columns (favorite thing about band, thing they're looking forward to, new thing they'd like to learn) under which students added a comment, had students share links to pieces they'd be interested in, and add links to great YouTube videos of someone playing their instrument. We've used it for brainstorming Genius Hour projects too. 
  • QR Codes
    • With a free scanning app and free sites to create your QRs, the uses are endless. Have a QR that links to your class site on all communications home. Put out QRs and do a paperless program at performances. Do scavenger hunts or use them on bulletin boards. You can even use them for your inventory!
  • Dotstorming
    • Dotstorming is a similar site to Padlet. It allows posting on a wall, but what I love about it is the option for others to directly comment and vote on a post. I've been using Padlet to have students share descriptions and links for potential concert pieces, but plan on using Dotstorming for this activity from now on.
  • Kahoot or Quizizz
    • Need a fun way to do some assessing? Try either of these quiz game sites! With Kahoot, questions need to be projected for students to see. They then use their device (phone, tablet, etc) almost like a game show buzzer and select the color/shape on their device that corresponds with the answers being projected. Quizziz is similar, but the questions show up on their device which means that a projector is not needed for games. Students can also move at their own pace and games can be shared for practice in things like Google Classroom. Both will give you detailed information after the game is done that can be used to check for overall understanding.
  • Poll Everywhere
    • This is the only site on this list that can potentially involve some cost, but it's only if you're using it for groups larger than 40 or want some of the other premium options. You can pose a question, and students respond by sending a text message. You can have the responses show as different graphs or even as a word cloud. If you're a BYOD or 1:1 where students all have their own device, this is a great option for some quick formative assessment
  • Plickers
    • If not all your students have devices, but you do, this is a good assessment option too! Each student has their own numbered card with a unique code (similar to a QR code) on it. When held a certain direction and scanned through the app it registers as an A, B, C, D answer or can be also set for true and false. You can use it to ask a quick question or use their site to create quizzes and assign students to a card number to get more detailed feedback. Aside from more concrete questions, it can be a good way to check for comfort level with a part, piece, or concept. Because students can't tell what their friends are answering, this can help give you a more realistic idea of where your students are. Click here for a more detailed post on using Plickers!
  • Aurasma or Blippar
    • Aurasma and Blippar are augmented reality (AR) apps. If you've never used AR, think of it like a QR code on steriods. Instead of needing to scan that digitized box to access information, it can be used with practically any image to create a trigger.  Imagine creating a word wall where when scanned with the app, a video of a student demonstrating the definition or concept appears! Or projects that when scanned, display a video of the student explaining it! For more information and ideas on using AR in the class, check out Two Guys and Some iPads.
  • Google Classroom
    • Google Classroom (GC) is a learning management system that allows for all kinds of ways to assess your students and share information. Here's a post I did for Band Directors Talk Shop on the basics of GC.  Here's a post with some more specific ideas for utilizing it in band.
  • Social Media
    • Instagram, Facebook, and Twitter! Oh my! Open the walls of your classroom to your students, families, and others and share what's happening. Students are excited to be part of "postable" moments and families love seeing pictures and videos of what they're doing daily. Your audiences are all using different platforms. Posting on multiple accounts can become cumbersome, but utilizing IFTTT to automate your posts can be a huge time saver and help you put your story in places your audience will see it. Social media is also an amazing way to stretch your own learning and help you be a more impactful teacher!
What are some of your favorites? Please share in the comments!


Monday, January 18, 2016

Why More Music Educators Need to Be on Twitter

This really applies to all educators, but it often seems that music educators need an extra nudge to interact with people outside our specialty.  It's not intentional. High school and college years were spent practicing, rehearsing, performing, and repeating the process. Then we started our jobs and found that we were the only music educator in the building or district. In grade level or department meetings we work with the PE and Art teachers (who should also hop on board the Twitter train!) or spend time alone in our rooms. Even when we teach in a larger district, we're still often the only music specialist within a building or are a part of a department of two or three.

Thankfully many have banded together (pun completely intended) and created some amazingly helpful groups on Facebook.  These groups have been an outstanding resource, but in them, we're only talking to each other.

Important conversations are happening surrounding education at every hour of the day on Twitter and music educators need expand their Professional Learning Network (PLN) to be a part of more of them.  Here's why:
  • PD you actually want on YOUR schedule
    • We need to keep learning, but often the opportunities provided for us are not always relevant to our classes. How much time have you spent in PD and thought of all the things you could actually be accomplishing?  Twitter offers you a chance to learn both from and with the experts in things you're interested in! Read an article at lunch. Join a chat in the evening. Ask a question, tag a few people, and see what kind of responses you get. 
  • Education Trends
    • Don't let the next direction in education take you by surprise.  That direction is already being actively discussed and implemented by educators on Twitter.  Chances are, there's even a regular chat or hashtag to follow. Moving towards Standards Based rather than traditional grades? There's a chat for that! Project Based Learning being encouraged? There's a chat for that too!  Want to just talk music ed in real-time? There's a chat for that!
  • Advocacy
    • There are conversations happening at the local, state, national, and even global level at all hours of the day on Twitter.  These discussions center around everything from teaching practice to learning philosophies to educational policy and just about anything else in between!  Not only can we learn a great deal from our non-music colleagues but we can share a great deal too (how many other teachers regularly see far more than 30 kids simultaneously without major chaos?). Things that seem common place for us may be totally eye opening for another teacher or administrator.  Our perspective is a unique one and we cannot get angry about being left out of the conversation if we never try to join in the first place.  
  • Inspiration
    • There are always rough days.  My PLN provides regular inspiration and motivation. Sometimes it's a relevant quote. Sometimes it's a positive post about things their students are doing. Sometimes it's a blog post. Sometimes it's a great article. Sometimes it's a great chat with passionate educators. Sometimes it's ALL of those things. And since it's on your schedule, you can find the inspiration you need when you need it.


Want to give it a try?  Great!  Here are a few quick steps to getting going.  There are many much more detailed tutorials that can be found with a quick Google search or you can hit up a session at your next conference or EdCamp.
  1. Create an account that actually uses most of, if not your full name.
    • Remember you want to connect to people on Twitter.
  2. Fill in some profile information.
    • People will connect based on who you are and what your interests are.
  3. De-Egg!
    • Having an actual profile picture will make you more accessible and help people to know you're not a spam-bot.
  4. Check out this chat schedule and follow along with something that interests you!
    • #Musedchat is held on Monday nights at 8PM EST
    • You don't have to be super active yet, just introduce yourself and watch.
  5. Follow some of the people in the chat and then follow who they follow.
Are you an established Tweeter? How has Twitter influenced your practice? And please share your handles in the comments so that we can find each other!


Saturday, December 26, 2015

Ideas for Google Classroom in Band

I've written about using Google Classroom before, but I'm seeing more and more conversations about it in places like the Band Director group on Facebook.  On every post from someone using it, there are often people asking in the comments about ways people use it with their groups.  I've been using it for about a couple of years with students and love it!  This is very obviously not an exhaustive list, but here are some ideas and tips for getting started.

Ideas for use:

  • Playing Assessments.  Have your students upload videos of themselves playing for you.  No more class time lost to tests and now you can really focus on the student playing.  I check tests from the comfort of my couch and no longer have to keep an eye on the other 50 kids in the class as I try to watch one play.  I can also back videos up, pause, and rewatch to give specific feedback if the student needs help.  What's beautiful is that many of the students will record themselves over and over until they get a good recording which means...they practice!  
  • Practice Reflections.  Basically students submit a weekly video of themselves demonstrating progress on a previous goal and setting a new one.  It's been a low key way to check on progress, check for trends, and get students taking more ownership of their learning.
  • Listening assignments.  Post a recording from class or a YouTube video for students to write about.  You can have them create their own document to respond to questions or create a template for them to fill in (the template works well for students who may still be figuring out how to use Google Apps).
  • Student Choice.  Let your students give ideas for pieces to play.  Post links to recordings or a list of possible choices.  Have them listen and give feedback with things like a Google Form, Padlet Wall, comment on the post, or use GC itself to create a direct question for students to write responses.
  • Go Paperless! Save a tree and post everything to GC. Permission slips, reminders, announcements, etc. 
Some tips:
  • Start small.  If your students are unfamiliar with Google Apps, keep your first few assignments simple to help them learn how to use it.  This was a mistake I made when starting off and it caused some serious speed bumps.  Don't assume that they know how to use the tech the way you want.
  • Encourage BYOT.  Personal devices in class can be a distraction if we let them.  But if we teach our students how to utilize them as the tool they can be, we're promoting responsible tech usage and digital citizenship.  If you're going to have them upload videos, have them bring the device they'll be using to class and try it there.  Between you and other students, they can troubleshoot and get help with different ways to upload.
  • Be flexible.  It's going to take some time to get all of your students (and their families) on board.  Our assignments have due dates, but I will take just about anything through the end of the marking period for the chance at full credit.  While much of the reasoning for this is due to my personal philosophy on learning (if they learn the Db scale a few weeks later than others, they're still learning and demonstrating proficiency), it also takes away the anxiety of uncooperative technology.  
  • Help parents too. Give paper copies of instructions on things like enrolling or completing assignments. Also, as of August 2016, parents can now enroll for Guardian Summaries! Click here for more information from Google on this helpful feature to keep families in the loop!
  • Connect with others. There is a Facebook Group called Google Classroom for Music Teachers where there are a lot of great ideas and resources shared. 
Do you use Google Classroom already?  What are some ways you use it with your performing groups?  Please share in the comments!

If you'd like to learn a little more about the nuts and bolts of Google Classroom, check out this post I did for Band Directors Talk Shop.


Tuesday, December 8, 2015

Don't Talk to an Empty Room

OK.  I've finally caved.  Instagram it is.  Now that I teach only middle school and many of my students are only allowed on Instagram but not Facebook or Twitter, I finally set one up for our classes.  In only a few months of having social media for our bands, the Instagram account has twice the followers of either of the others.

If social media is an important part of connecting with families, then we have to keep up with what is being used most frequently now, which with my students meant jumping into Instagram. This is not to say that other platforms are obsolete, but each one provides another opportunity to make different connections and reach our audiences where they are.

In all honesty, one of my biggest reasons for not creating Instagram account was because I didn't want to maintain three separate accounts.  Enter If This Then That! IFTTT is an amazing resource that I use to connect all three accounts. In the hands of more experienced users, this site can be used to automate things I hadn't even thought of.  For me though, this means that with one post, three separate accounts are updated. The posts are also better visually than when doing things like linking Twitter and Facebook. The Facebook posts actually show up as their own post rather than a Twitter link and the Twitter posts show the picture you shared instead of just the Instagram link and caption.  

IFTTT uses "recipes" to link your accounts.  Just search for what you want to set up.  For example: "If Instagram then Facebook page." There will be plenty of ready made recipes that you can borrow. It takes a little bit of work on the front end setting up and linking your accounts, but that time is well worth it.  You can even tweak existing recipes to fit your needs.  I wanted my Instagram photos to post on Facebook, but didn't really need them to go into an album.  I just clicked on the recipe and left the spot for an album name in the recipe blank.  

We have to adapt and move ahead with our audience.   Sharing info in places nobody is looking is like talking to an empty room.  If we want to share our story, then we need to tell it in places people will keep hearing it.


Monday, August 24, 2015

8 Tips to Boost Your School Social Media Presence

You've heard it before.  "If we don't share our story, someone else will."  Using social media is a powerful and easy way to go to our audience and share our story rather than requiring them to find us.  For social media to be effective though, you need people to follow you to see what you're sharing.

Since most of us running these pages are educators and not PR reps, it takes some experience through trial and error to figure out what works for you.  As a former social media coordinator, I've had the chance at some of that trial and error.  Here are a few tips from my experiences:

  1. Engage Your Audience
    • Don't just share information and updates. Get the audience involved!  Have a caption contest.  Ask them to share or retweet a post.  We once had a door decorating contest and the winner was partially decided on by the number of retweets or likes their door got.  Traffic and followers on the pages went way up!  Facebook's settings also show followers more content from pages they engage in, so getting them involved will help your traffic.
  2. Post Regularly, But Don't Bomb Their Feed
    • I tried to post every day at the least.  Very often though, there were days with multiple posts to be shared.  It may be tempting to put everything up all at once, but this means much of your information could be missed, especially on Facebook.  Use a tool like TweetDeck or Facebook's post scheduler to spread out your content over time.  
  3. Use Tags in Posts When Possible
    • If students go on a field trip, work with a local organization on a project, participate in an event, etc., find their social media info and tag them in your posts! (hint: your Facebook page has to "like" theirs before you can link them in a post)  Many times, the venue or organization will share your post which, once again, will help spread your story to more people.
  4. Mix It Up
    • Share pictures, video clips, pertinent articles, flyers, and links.  Your audience follows for varying reasons, so content should be varied too.  Also, if you need to share a basic announcement, rather than leaving it just as plain text, use something like Canva or Smore to create more eye catching posts and flyers.
  5. Hashtags
    • Use them!  Create a school or district hashtag (hint: be sure to search a hashtag and make sure it's not already in use before advertising) and encourage others to use it.  Many teachers and school related organizations have their own social media accounts. Encourage them to use the hashtag to make your content easier to search and view.  
  6. Advertise Your Social Media 
    • Put reminders about your pages in newsletters.  Link to your pages from the school/district website.  Try putting up QR codes around your schools that link to the pages.  Use your chosen hashtag on school gear.  
  7. Change Up Your Graphics
    • Adjust your cover photos for things like upcoming events, seasons, congratulations/celebrations.  Canva has a great tool to easily create cover photos for Facebook and Twitter.  A contest could even be held for the best designs to get your audience involved!
  8. Sometimes It Pays to Pay
    • Organic reach through views and shares should be the goal, especially when we're all trying to save money, but sometimes the payoff for spending money to advertise your page or event is worth it.  A quick Google search will turn up a lot of helpful articles on sponsoring content.
Remember, there are people who take classes and do this as a full time job, so don't worry if you don't figure it out all at once.  The important thing is to reach out and make connections with your families.

This is obviously not an exhaustive list, but I hope it's a helpful one.  Did I miss something?  Have an amazing tip to add?  Please leave it in the comments!

Sunday, March 15, 2015

In Rehearsals, BYOD Doesn't Have to Be the Enemy

A little while back, a director wrote a post in the Facebook Band Directors' Group asking about policies regarding cell phones in the band room.  From some of the responses, you would have thought she was asking about something much worse than a piece of technology that both directors and students alike carry around without a second thought.  Many heartily embraced banning the devices altogether and some even advocated suspensions for first offenses.  I do understand that some were working within their school or district rules, but many were not.


I get it.  I’ve been in rehearsals and concerts where phones have gone off at highly inappropriate and inopportune times.  I’ve caught students texting and playing games in class.  However, our first thought as educators should not be a punitive one.  With the further implementation of Bring Your Own Device policies (BYOD) and more schools going 1:1 with mobile devices, we need to adapt, not put our heads in the sand.


Technology is not going anywhere and modeling its responsible usage should be high on the priority list for all educators.  There will be hiccups and students who abuse the privilege, but that shouldn’t mean the complete avoidance of all devices.  Instead, we should look at it as another opportunity to help students learn responsibility with their technology.  


Way back in the day (or 10-15 years ago) I paid almost $70 for a tuner that would actually pick up my piccolo when I practiced.  A few years later, I bought a Metrotuner for $40 that not only worked with my piccolo, but had a metronome and a single tone generator too! Technology improved and offered a less expensive but higher quality option.


The same is happening with phones and other mobile devices.  I use the Tunable app on my phone and the Tonal Energy Tuner on my iPad on an almost daily basis with my band classes. My new favorite one for students is Bandmate. Not only was it developed by a band director, it's FREE and shows the note on the staff which is a huge help for young brass players. I encourage students to have this app open and on their stands every day.

IMG_20150209_073641715_HDR.jpg
Junior high student uses Tunable app.

It’s been amazing to see students take greater control of their musicianship.  A lot of the mystery has been taken out of the concept of tuning for my middle school students. (Before you start voicing concerns about relying solely on the visual for tuning, we tune by ear first and then I give them time to check their accuracy with their devices.)  Students are looking at my score for tempo markings before sectionals because they have easy access to a metronome and aren’t fighting over the one the band owns.  


Instead of outright bans and harsh negative consequences, why not work with students to create an acceptable use policy for your ensembles?  Most students have a good grasp of when it is and is not appropriate to use their phone, they just don’t always choose to follow.  By including them in the decision making  process, you’ll be helping them take ownership of their technological responsibilities.

We need to stop looking at phones and mobile devices as a noisy and annoying enemy and embrace their usage.  We’re rapidly reaching a point where the students we’re teaching will never have been alive during a time when smart phones were not available. Banning such a powerful tool is a futile effort when working with students who use their devices as a natural extension of themselves.  If we want to remain relevant, we need to find ways to utilize it as the tool it’s meant to be and, in turn, help our students develop responsible digital citizenship.

There are many other ways to utilize individual technology in rehearsals. What are some ways you encourage responsible tech usage in your band and music rooms?